If you are looking for free software to do some simple video editing job, Windows Movie Maker will be the best choice for you. It’s already build-in all windows computer; you don’t have to download anything.Windows Movie Maker works with camera and camcorder pretty well. And this step by step guide will show you how to use Windows Movie Maker to make and edit video, you can handle it even you are computer newbie.
First, you have to import some videos into Windows Movie Maker, and I take camcorder video as example. Windows Movie Maker supports wmv video pretty well, if your video is not compatible with WMM. This guide will show you how to convert video to windows movie maker compatible video.
Step1. You need a USB cable to connect your camcorder to computer. Then run Windows Movie Maker (WMM). Go to “Capture from video device” in the left hand bar.

This will pop up a box asking you what you want to call your new video file and where in your computer you would like to store the video footage. Make your selections and then press “Next”.

Step2. After making your decision and clicking next, the next box will ask you if you want to capture the whole tape or just portions of it. If you have used up a whole cassette on the same movie then you can just let Windows Movie Maker capture the whole lot. But if you only want to capture part of the tape (perhaps if you have several movies on the same tape and you only want to work on one), choose the second option.
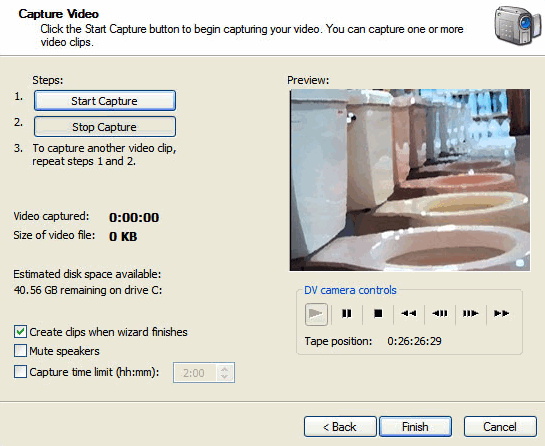
Everything here is pretty much self-explanatory. Keep the “Create clips when wizard finishes” option ticked. You can mute speakers if you want to.
Step3. Press “Start capture”. You’ll then start to see “video captured” and “size of audio file” start to increase. Make sure you have enough space on your computer to store it all! When you have all the footage captured, press “Stop capture” and then the “Finish” button. The footage will then be broken up into “clips”.

To get started on editing it, highlight all the clips you want in your movie and then drag it to the bottom into the timeline. Everything will then be moved down and you’re ready to begin editing.

If you press “show timeline”, you’ll see another view of the clips. This is the view you will need to look at if you want to add anything extra such as music, credits and extra footage in the right places:

At the top of the screenshot, you will see two little magnifying glasses (one with a plus and one with a minus). The plus one zooms in and gives you the timeline in a more detailed time frame. At the moment you can see the time being split up into 5 second intervals. Zooming in, you can have the timeline split up into one second intervals. Again, that’s good for inserting extra features at exactly the right moment of the movie. The minus magnifying glass zooms back out into bigger time chunks. To edit, take one clip at a time. Click on the “show storyboard” view and then click on the clip. It will immediately show up in the media player at the top:

When you press “play” and the footage starts rolling, a small button will then activate (shown by the red arrow in the screenshot above). This button is your editing button. When you get to the point where you want to remove a piece of footage, press the editing button. The footage will then be split in two and a new clip will be created. Keep that clip rolling till you get to the end of the part you want to remove. Click the button again and again it will be split. This results in a clip in the middle which is the piece you don’t want. Now, right-click and select “delete” to remove it from your storyboard.
Step4. The next thing might be to improve the quality of the picture or the sound. You may have filmed a scene in poor lighting or the audio might be a little faint. Movie Maker provides some options for improving things like that. Click on the clip you want to alter and then right-click. A little menu will pop up. Choose “Video Effects”. You’ll then see options for changing the clip. Just make your options and save. Now, replay the clip and you should see your changes.

If you want to change the audio volume, click on the clip you want to alter and then press the audio button on the far left. Increase or decrease as desired. Remember to keep saving all your changes.

Step6. You can enter credits anywhere in the video but normally you would see them at the beginning and the end. So let’s do the start credits first. Go to storyboard view and click on the first clip. At the top menus, choose Tools–>Titles and credits. Choose the first one and you will then get boxes to type your credits in.
The options are self-explanatory and as you do each one, the changes are immediately shown on the media player so you can see if they look the way you want them to. You have a variety of animations to choose from and you can change the font style and background colours. When it is finished, the credits will automatically be inserted into your story board. If it is in the wrong place, just click and drag the clip with your mouse to wherever you want it to go.

To do the end credits, just go to Tools–>Titles and credits again and choose the end credits option.
There are three other main options to import material into your movie: Music, photos and other movie material.
By inserting photos, you can perhaps put some music to it and have a musical montage! You first have to edit your MP3 or WMA file in something like Audacity. You can get many free music from limewire or torrent and you then need to edit the file down to the correct length. Movie Maker allows you to fade in and fade out or you can put the fading in via Audacity. It’s up to you. To insert the music, go to “timeline view” and you’ll see an area below the pictures for music (audio/music). Next, import the music file into Movie Maker and wait till the file appears at the top of the screen. When the music is in the right place, save it and play it back in the media player to make sure that it is all correct.

If you want to insert a clip from another movie file, just import it from your computer and drag it into the appropriate position in your storyboard.
Step7. It’s time to export the video file. Go to File—>Save movie file in the top menu and you will have to make some selections as to the file name and where you want to put it in your computer. When you are finished and clicked “start”, it will begin transferring the saved movie file to your computer in WMV format. If you want to upload your windows movie maker video to YouTube, you can refer to this step by step guide for help.
https://freedvdripper.net/upload-windows-movie-maker-to-youtube.html
That’s’ all, for more details guide about Windows Movie Maker, you can refer to this Windows Movie Maker FAQ.
Free Download Windows Movie Maker Video Converter
 |
 |
|
Learn more features about Windows Movie Maker Video Converter by visiting here