![]()
Sometime, you’d like to rip blu-ray or copy blu-ray movie to computer for playback elsewhere, or convert the blu-ray HD movie into a more manageable file size for watching on a computer, phone, iPod, PSP, Zune, game console or PMP. And this step by step guide will teach you how to do that. Enjoy it.
Before starting the guide, there are somethings you should know: Blu-ray Disc has hard CSS protection, it will take a really long time to rip a blu-ray disc. It’s like trying to rip a DVD in 1999: computers still have a long way to go before this is easy. Moreover, the blu-ray ripped movie file will take up much harddrive space, at least 30 GB. Now, let’s start the blu-ray ripping guide.
What’s you’ll need:
- A Windows PC (the Blu-ray ripping process is, at the moment, Mac-unfriendly)
- AnyDVD HD (free fully-functional 21-day trial) for ripping and decrypting Blu-ray discs. Here is AnyDVD HD direct download link. The file size is about 2.04 MB.
- RipBot264 (free) for transcoding from AVC (you’ll also need a few codecs to go along with it: .NET Framework 2.0, theavisynth and ffdshow codec packs, and the Haali media splitter)
- tsMuxeR (free) for muxing (may not be necessary)
- A Blu-ray drive
- A ton of free hard drive space (80GB or so to be safe)
- A decent understanding of how video codecs and containers work (Matt’s Giz Explains has everything you need)
How it Works:
AnyDVD HD is a driver that sits in the background, which automatically removes the AACS or Blu-ray+ security lock and the region code from any Blu-ray disc you load, allowing it to be ripped. The video on most Blu-ray discs is encoded in the MPEG4 AVC format in .m2ts files, so it will need to be transcoded from AVC to something else (like an H.264 MP4 file) for playback on other devices. MPEG4 AVC doesn’t have wide support in all of the best video transcoders we alread love, like Handbrake. This makes finding a free and easy transcoding solution a little tougher, but thankfully RipBot264 seems competent.
You can then either transcode directly from the disc, or go the route I took and rip the disc to your hard drive before running it through the transcoder, which reduces the chance for errors. Give both a shot to find what’s easiest.
Thanks to poster Baldrick’s guide on the Videohelp.com forums and the folks at Doom9—these instructions are based on info found there. Check them out if you get stuck.
How to rip Blu-ray Disc and copy Blu-ray Movie to computer
Again, if you want to try transcoding directly from the disc at the sacrifice of speed or the chance of corruption, you can skip this part (except for step 1) and go to step 4.
1. First up, download and install all the necessary software: AnyDVD HD and RipBot264, which also requires .NET Framework 2.0, the avisynth and ffdshow codec packs, and the Haali media splitter. These codecs, nicely enough, should give AVC decoding capabilities system wide, so apps like VLC and Windows Media Player should be able to play them without problems.
2. Fire up AnyDVD if it’s not running yet, and from the fox icon in the system tray, choose “Rip Video DVD to Harddisk.” Choose a save point where there’s a healthy 40-50GB free and start it a-rippin’. It’ll probably take around an hour.
3. When it’s done, open up the BDMV/STREAMS directory and try to play the largest .m2ts in VLC or WMP. It should play fine with sound, but if anything’s fishy, you may want to try re-loading RipBot264’s required codecs or trying another AVC codec like CoreCodec’s CoreAVC. This is more paid software, but like AnyDVD, it comes with a free trial period. You need to be able to see and hear an .m2ts file normally during playback before you proceed.
How to convert the ripped blu-ray movie
4. Open up RipBot264. When you try to run RipBot264 the first time, it may say you haven’t installed ffdshow even if you have. If this is the case, open the RipBot264.ini file in Notepad and change “CheckRequiredSoftware=1” to “CheckRequiredSoftware=0” and save it.
5. Click “Add” and select the largest *.m2ts file found in your ripped Blu-ray disc’s BDMV/STREAMS folder. RipBot will then analyze it and find the various programs available to encode—you want the one that matches the runtime of your movie, and not one of the special features. RipBot will chew on this file for a long time, and hopefully when it’s done, will present you with this dialog:

6. If RipBot throws an error of any kind here, first make sure you’ve got a bunch of HD breathing room on the volume you’re using.
If errors still come up, you may have to mux your rip. To put that in English: Blu-ray discs have a lot of different files on them representing several different audio and video streams. The process of joining all of these disparate elements into a single stream (usually a .ts file) is called multiplexing, or muxing, and its necessary to do before transcoding. RipBot264 can do this on its own, but it has problems with certain discs. So if any of the above fails, download tsMuxeR, select the biggest .2mts file in the BDMV/STREAM folder in your rip or on your disc, choose the appropriate language, and hit “Start Muxing.” You can then add the resulting .ts file to RipBot264 as the source.

7. Now you can choose how you want to convert the video. RipBot gives you presets for Apple TV, iPod or iPhone, PSP or a high-res file which can then be re-burned to a new Blu-ray disc. I chose the iPod/iPhone level.
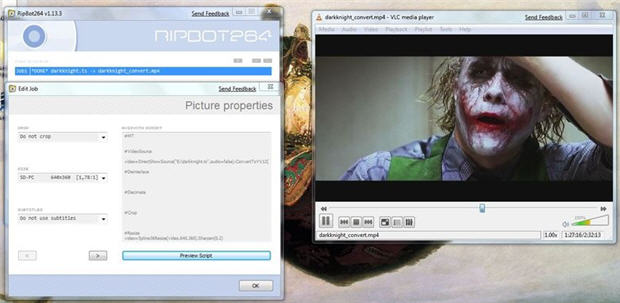
8. Click “Properties”—here you can fine tune the output size of your video (I chose a nice 640×360 file) and preview it before you begin. MAKE SURE you preview your choices using the “Preview Script” button, because you don’t want to sit through the eternity of transcoding only to find that your dimensions are messed up and everything is in the wrong aspect ratio.
9. If all looks and sounds good, press OK, then “Start” and watch as your system transcodes the massive 1080p AVC stream into a new MP4 file. On my 2.53GHz Macbook Pro, it averages around 20fps, which is actually slower than real time playback. So you’ll want to set this and forget it.

10. Wake up the next morning, have your coffee, and check your output file. It should play beautifully in your media player of choice, and look crisp as a kettle chip. My 640×360 encode of the Dark Knight was around an even 1GB in the end, which is not bad at all. Copy it to your device of choice and enjoy.
Free Download Blu-ray Ripper AnyDVD HD
 |
 |
|
Learn more features about Blu-ray Ripper AnyDVD HD by visiting here