This step by step guide will show you how to burn video to DVD using Windows Movie Maker (the functionality offered by the Windows Vista operating system). If you are Windows Vista user, and you are looking for free DVD burning software, this tutorial would help you a lot.
Before start the guide, I want to make some observations: making a Video DVD is not a difficult task and Windows Vista succeeded in offering a pretty good solution. However, there are many other software suites that offer plenty of features and make this job easier and better.
ConvertXtoDVD and AVS Disc Creator are two of the most popular solutions for burning CD’s and DVD’s.If you need more than just basic CD and DVD burning or you just want the “best there is”, then consider these additional software like ConvertXtoDVD and AVS Disc Creator. If you don’t want to download additional software or you don’t need more than just basic CD and DVD burning, then Windows Vista offers the perfect solution for you.
ConvertXtoDVD - Learn More about it, Directly Free Download Link (16.8 MB), Step By Step Guide;
AVS Disc Creator - Learn More about it, Directly Free Download Link (16.9 MB), Step By Step Guide;
Now… let’s show you how to burn Video to DVD with Windows Movie Maker in Windows Vista.
Step1. Click the “Start” button and select “Windows DVD Maker” (or go to Start -> All Programs -> Windows DVD Maker).

Step2. Click the “Add items” button from the top menu and browse to the folder were the movies you want to burn are located. By default, they should be found in the “Videos” folder.
Step3. Select the movie(s) you want to burn and type the “Disc title”. Also, you may select the order in which the movies will be saved on DVD. To do that, select a movie and press the “Up” or “Down” button to change its order.

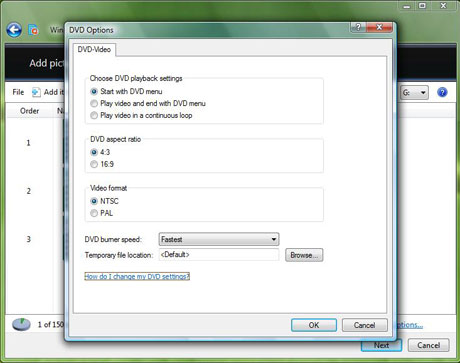
Step4. If you want to, you can click the “Options” button and set things like the burning speed, the aspect ratio, the video format or you can choose if the DVD will have a menu or not.
Step5. After you finished making the settings you want, click the “OK” button and then “Next”.
Step6. At this step you can create a custom DVD menu or you can select a predefined one. To select a predefined menu, scroll the “Menu Styles” list and select the one you like most. You can customize it by pressing the “Customize Menu” button and making the settings you want. Also, you can change the menu text by clicking the “Menu text” button and typing the text you want for each button.

Step7. When you have finished making all the customizations, click the “Burn” button.

First, Windows DVD Maker will encode the movie in the appropriate format and then it will burn it on DVD. Usually, the encoding process takes much more time than the burning so you have to patient.
The movie that I burned on this Video DVD had 107 minutes and 2.16 GB. The time that passed since I hit the burn button and until the DVD was finished: 2 hours and 3 minutes.
If you want to burn DVD with faster speed. I’d like to recommend ConvertXtoDVD to you, with the same movie and DVD, ConvertXtoDVD takes about 47 minutes to finish the burning.
| DVD Burning Software - ConvertXtoDVD | |
 |
 |